CUDA Programing Guide 阅读笔记
因为在 CUDA 13 后似乎我们的 CUDA Programing Guide 做了一次更新,而且离上次看 CUDA Programing Guide 过了很久了,常说书读百遍,其义自现。所以这里打算再读一遍。
本身就已经分成了五个 Parts,分别是 Introduction and Programing Model Abstract,Programing GPUs in CUDA,Advanced CUDA,CUDA Features 和 Technical Appendices。
我们先做一个概览,Introduction and Programing Model Abstract 可以带你快速阅读一下 CUDA 的编程模型,然后是教你如何入门写一个简单的 SIMT Core,往后是重要的 CUDA APIs 以及 Kernel Programing,接着 CUDA Features 则是给了你很多深度使用 CUDA 的能力,再往后则是一些技术性的附录。
Introduction and Programing Model Abstract
Section titled “Introduction and Programing Model Abstract”最初的 GPU 是为了图形处理,但是后来发现他也可以用来做通用计算。这要从他的特性聊起,他牺牲了单个线程的能力,来大幅度提高对应的并行度,从而在很多任务中,性能大幅超过 CPU。现在当然也有类似 Nvidia 自己的 Warp 和 OpenAI 的 Triton。
https://github.com/NVIDIA/accelerated-computing-hub?tab=readme-ov-file
那么我们怎么学习 CUDA 呢,这里有一个 nvidia 新给的仓库,里面可以支持你在 colab 直接用对应的 GPU 进行学习。
不过这里按下不表,下面会专门的篇幅介绍这个课程。
包括 Programing Model 之类的,我觉得通过 Fundamentals of Accelerated Computing with Modern CUDA C++ 可以获得更好的认识。
Fundamentals of Accelerated Computing with Modern CUDA C++
Section titled “Fundamentals of Accelerated Computing with Modern CUDA C++”下面我们主要根据这个课来讲解下,现代 CUDA C++ 怎么完成对应的工作。
Execution Spaces
Section titled “Execution Spaces”首先先教你如何实现一个 elementwise 开始。如果是 CPU 的代码,我们一般会这么写:
#include <cstdio>#include <vector>
int main() {    float k = 0.5;    float ambient_temp = 20;    std::vector<float> temp{ 42, 24, 50 };
    std::printf("step  temp[0]  temp[1]  temp[2]\n");    for (int step = 0; step < 3; step++) {        for (int i = 0; i < temp.size(); i++) {            float diff = ambient_temp - temp[i];            temp[i] = temp[i] + k * diff;        }
        std::printf("%d     %.2f    %.2f    %.2f\n", step, temp[0], temp[1], temp[2]);    }}
我们创建了一个 std::vector,然后对这些做了一个逐元素操作(elementwise)。
这个操作是什么呢?就是让这个元素更加接近 20,每次都减半对应的距离。
不同的 CPU 支持不同的指令集,在 x86 的 CPU 上 temp[i] + k * diff 会被编译成 vfmadd132ss 而在 arm CPU 上会被编译为 vmla.f32。当然,GPU 也有对应的指令集。
下面的图片介绍了这个在不同的设备上会怎么执行:
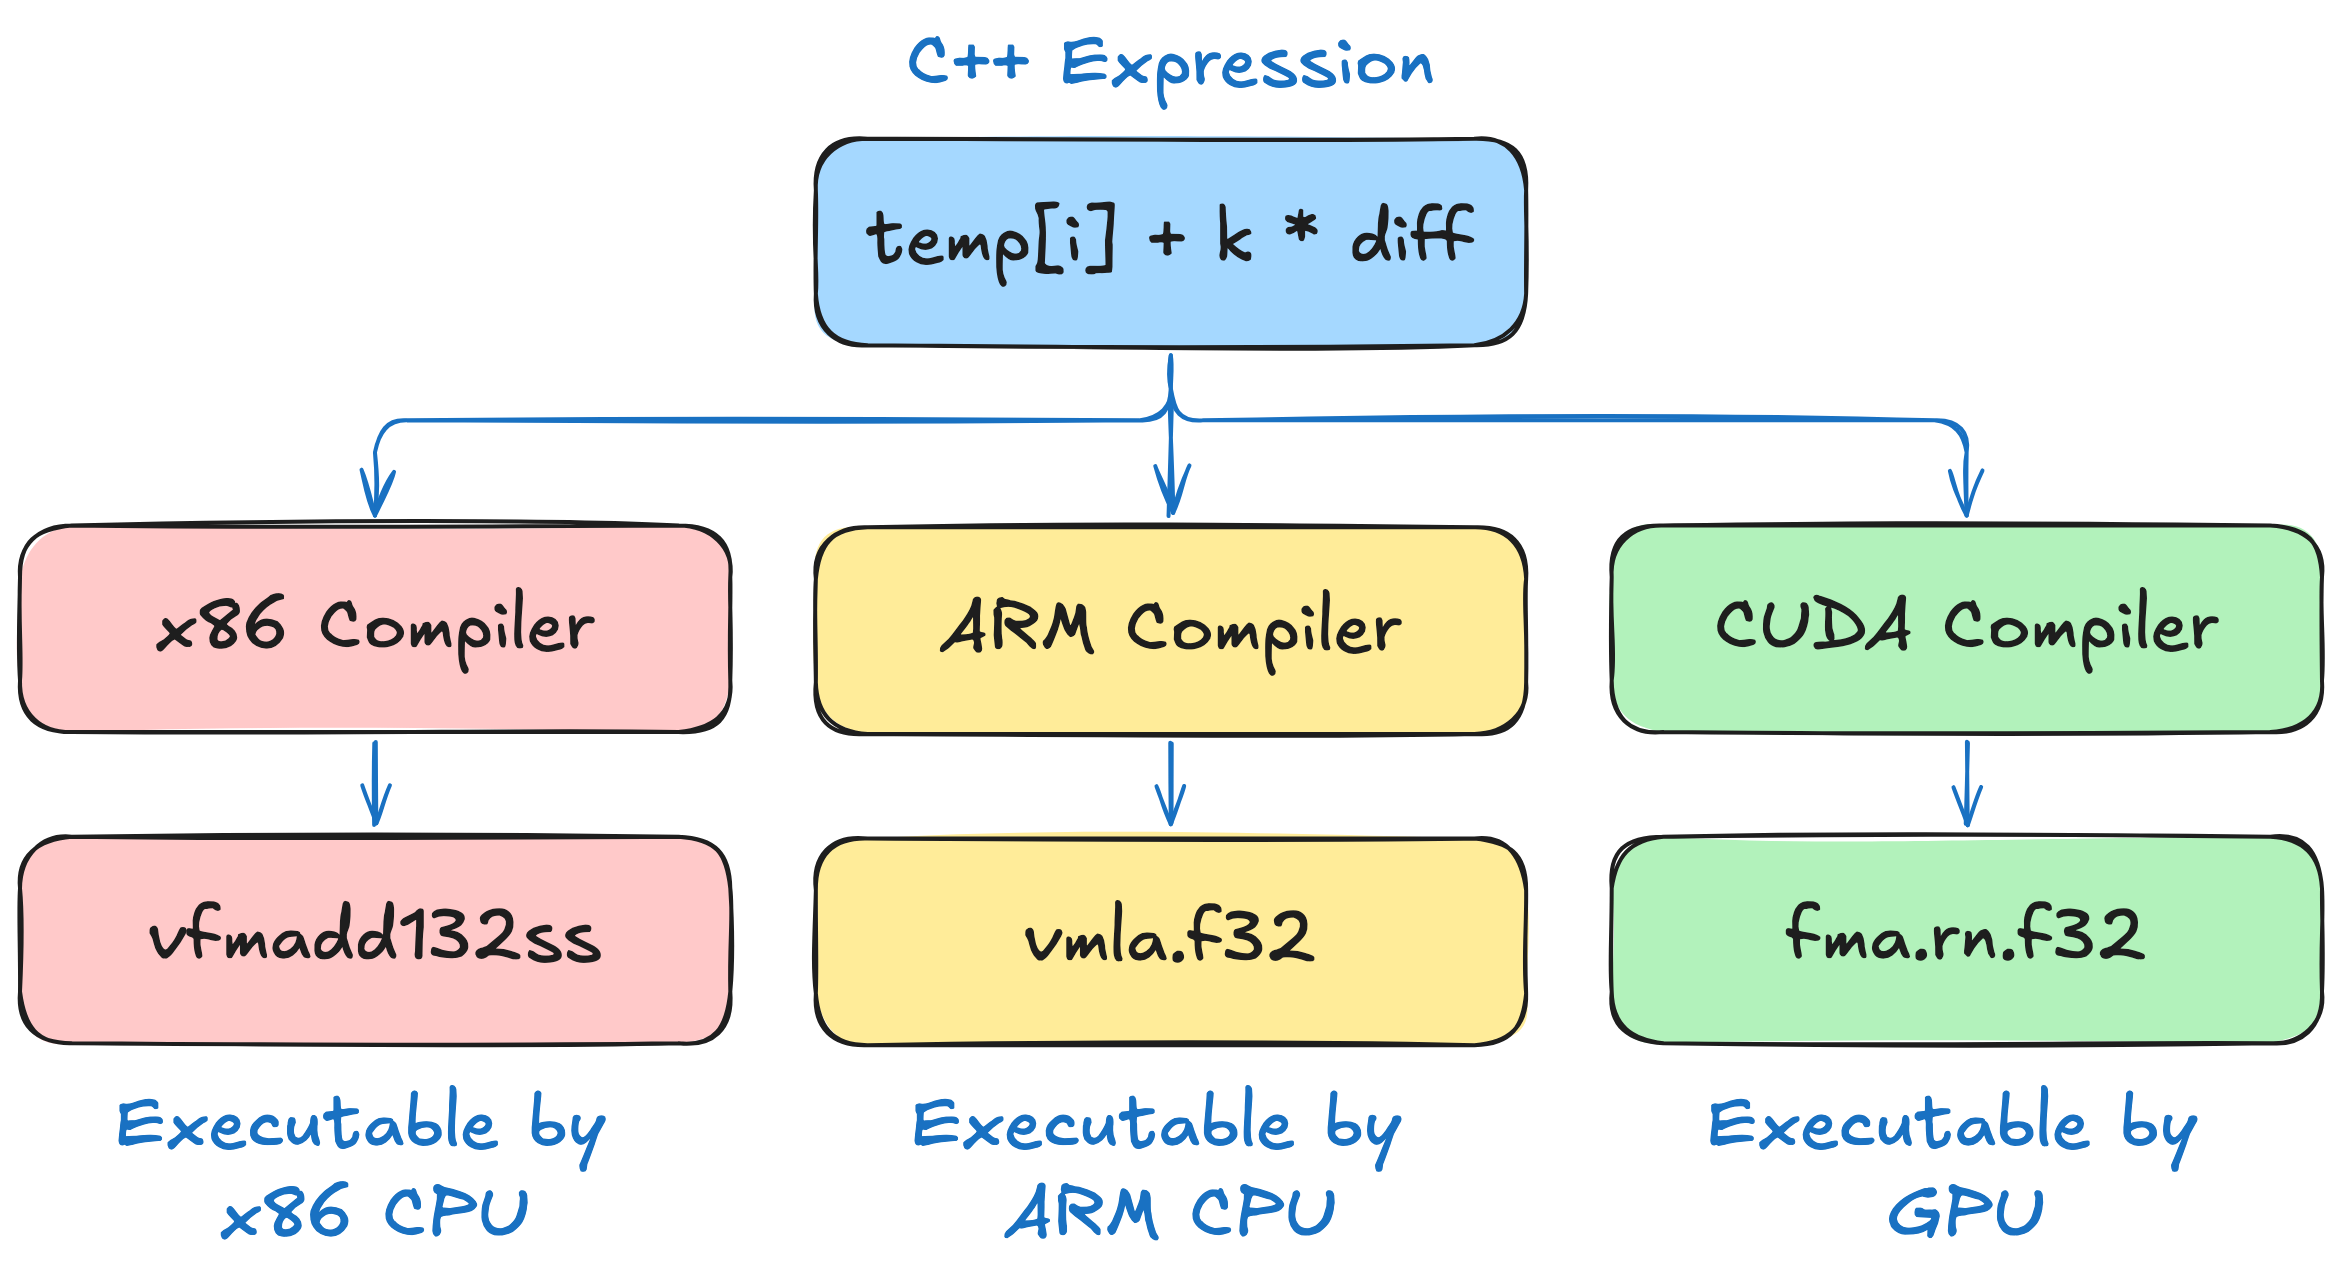
但是我们的 GPU 更接近于加速器而不是独立的处理器,所以我们要执行对应的任务的时候一般需要从 CPU 启动对应的任务,随后 launch 到 GPU 上,最后实际上在 GPU 上执行。
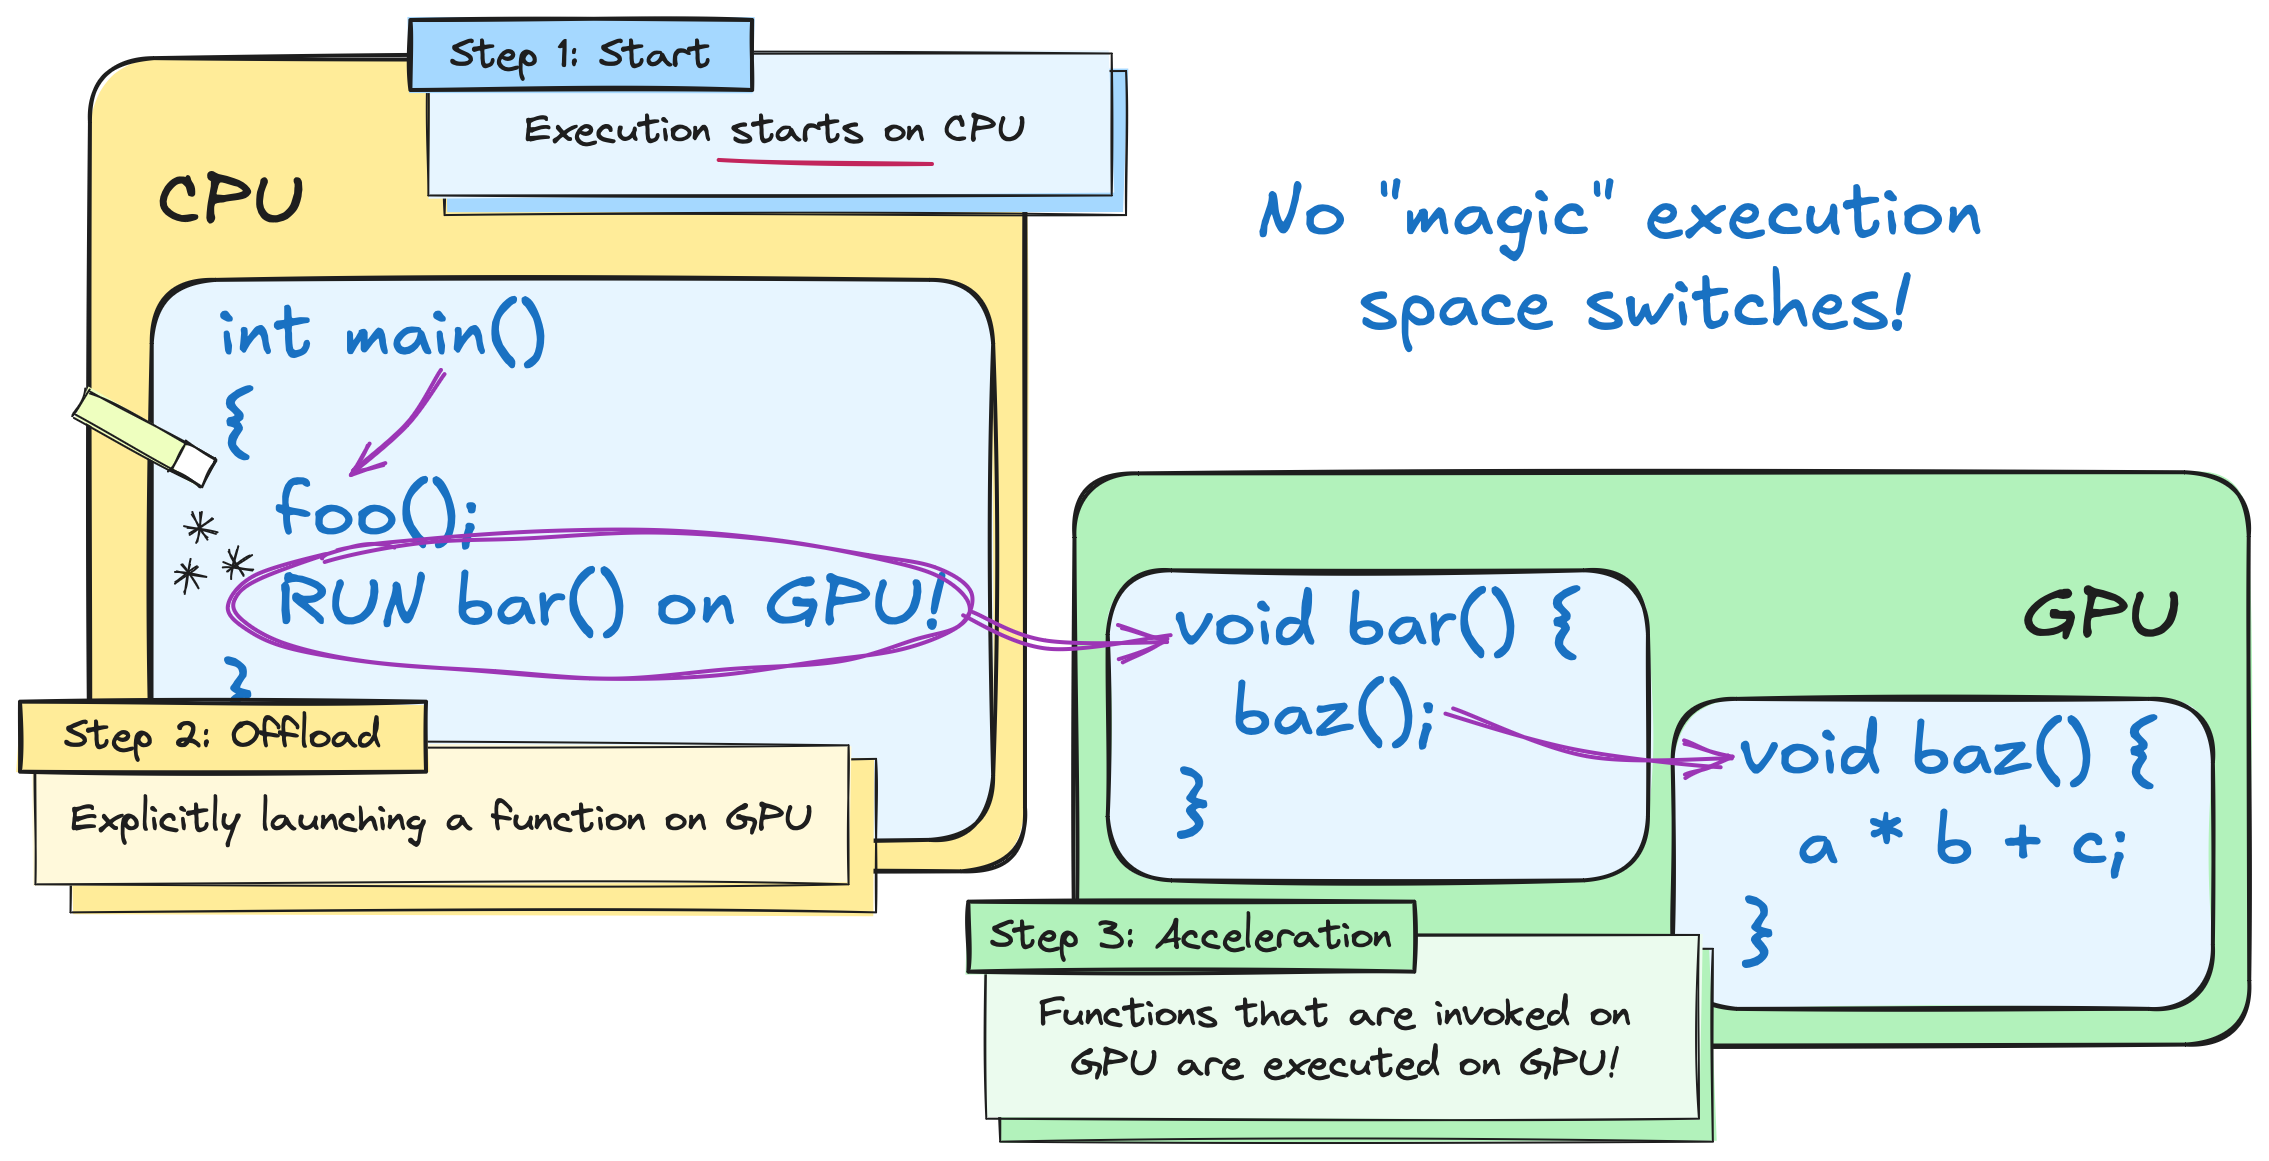
这就带来了不同的执行空间,我们在 CPU 侧称之为 host 在 GPU 侧称之为 device。
NVCC 对 C++ 进行了扩展,允许指出哪些代码是在 device 侧执行的。
对于上面的代码,我们可以用 stl 重写成利用 std::transform 的版本。
#include <algorithm>#include <cstdio>#include <vector>
int main() {    float k = 0.5;    float ambient_temp = 20;    std::vector<float> temp{ 42, 24, 50 };    auto transformation = [=] (float temp) { return temp + k * (ambient_temp - temp); };
    std::printf("step  temp[0]  temp[1]  temp[2]\n");    for (int step = 0; step < 3; step++) {        std::transform(temp.begin(), temp.end(), temp.begin(), transformation);        std::printf("%d     %.2f    %.2f    %.2f\n", step, temp[0], temp[1], temp[2]);    }}
当我们用 CUDA 的办法去写,就可以直接换成下面的代码。
#include <thrust/execution_policy.h>#include <thrust/universal_vector.h>#include <thrust/transform.h>#include <cstdio>
int main() {    float k = 0.5;    float ambient_temp = 20;    thrust::universal_vector<float> temp{ 42, 24, 50 };    auto transformation = [=] __host__ __device__ (float temp) { return temp + k * (ambient_temp - temp); };
    std::printf("step  temp[0]  temp[1]  temp[2]\n");    for (int step = 0; step < 3; step++) {        thrust::transform(thrust::device, temp.begin(), temp.end(), temp.begin(), transformation);        std::printf("%d     %.2f    %.2f    %.2f\n", step, temp[0], temp[1], temp[2]);    }}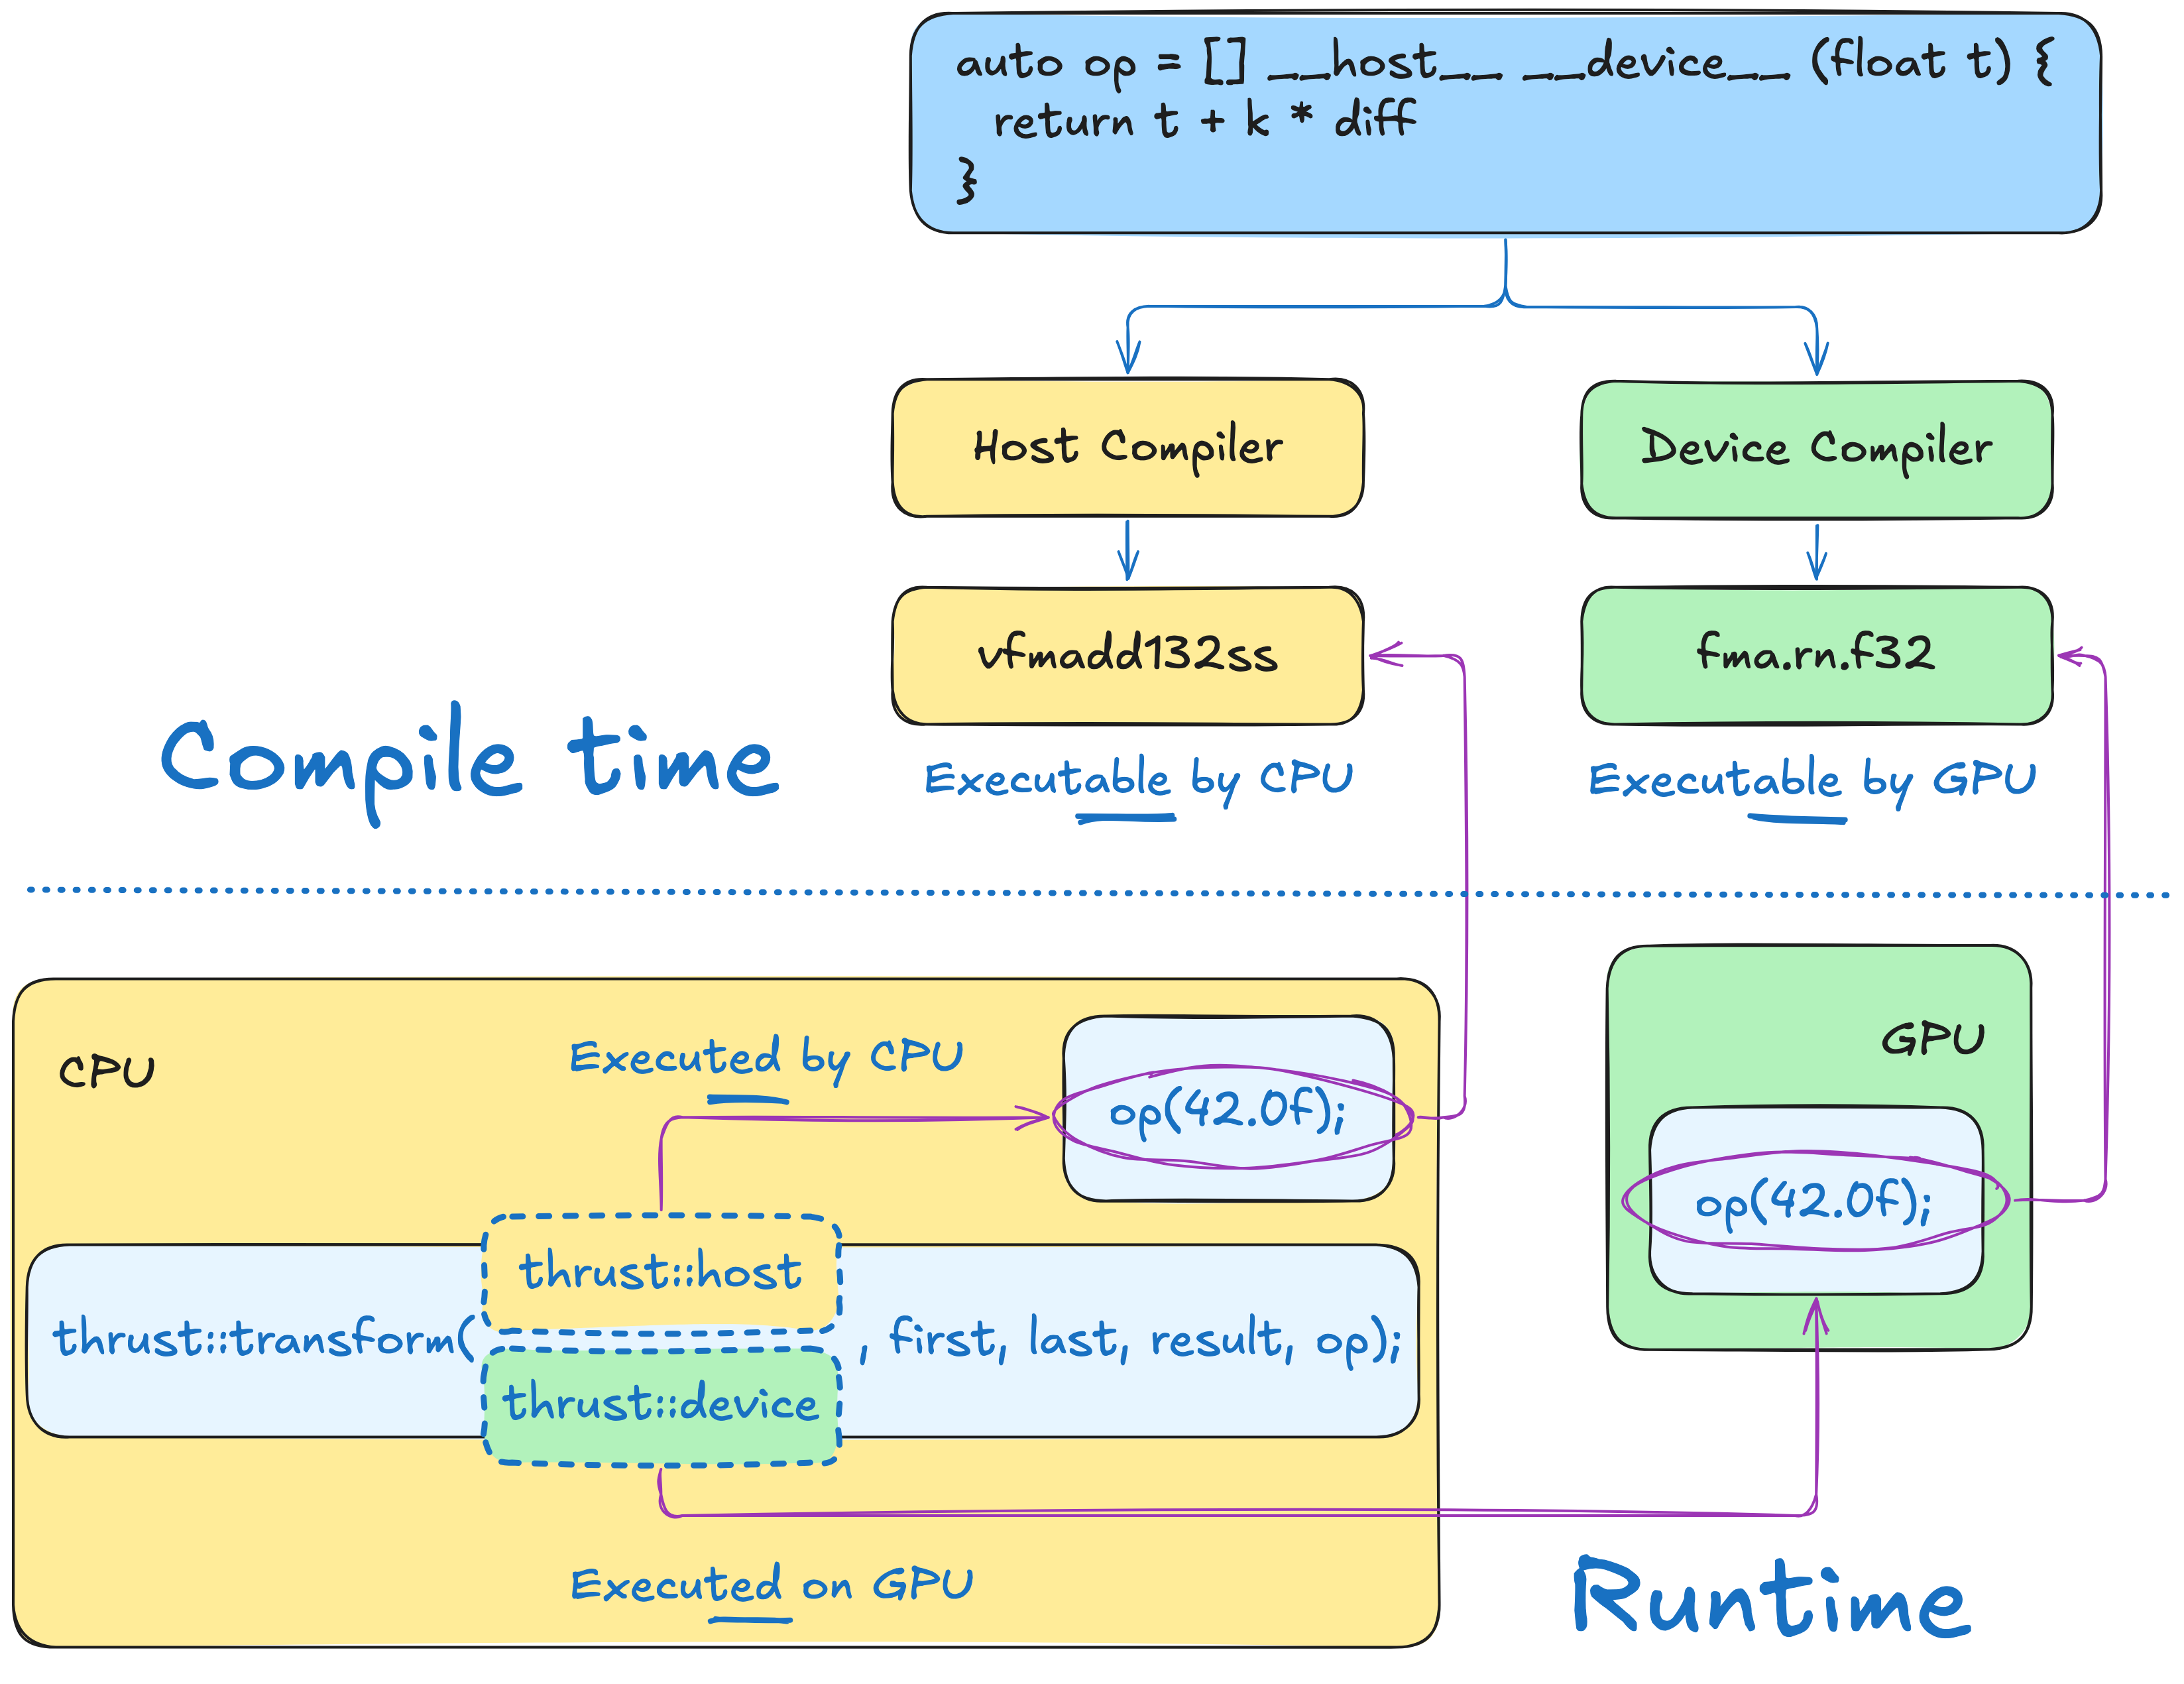
也就是说,我们最后如何执行,都是看我们怎么指定,不过我们要预先告诉编译器是怎么干的。这个有对应的练习,可以在 nvidia 的仓库找到
- https://colab.research.google.com/github/NVIDIA/accelerated-computing-hub/blob/main/tutorials/cuda-cpp/notebooks/01.02-Execution-Spaces/01.02.01-Execution-Spaces.ipynb
- https://colab.research.google.com/github/NVIDIA/accelerated-computing-hub/blob/main/tutorials/cuda-cpp/notebooks/01.02-Execution-Spaces/01.02.03-Exercise-Changing-Execution-Space.ipynb
- https://colab.research.google.com/github/NVIDIA/accelerated-computing-hub/blob/main/tutorials/cuda-cpp/notebooks/01.02-Execution-Spaces/01.02.03-Exercise-Changing-Execution-Space.ipynb
- https://colab.research.google.com/github/NVIDIA/accelerated-computing-hub/blob/main/tutorials/cuda-cpp/notebooks/01.02-Execution-Spaces/01.02.04-Exercise-Compute-Median-Temperature.ipynb
Extending Algorithms and Lazy Evaluation
Section titled “Extending Algorithms and Lazy Evaluation”在前面的练习中,我们知道了怎么用 thrust 去替换掉一些 standard 的方法,在这节课,我们要用来处理一些复杂一些的方法,这就要用到 vector 的迭代器了。
这样子也可以通过传递一个 lambda 表达式来自定义 functor。
#include "ach.h"
float naive_max_change(const thrust::universal_vector<float>& a, const thrust::universal_vector<float>& b){ // allocate vector to store `a - b` thrust::universal_vector<float> unnecessarily_materialized_diff(a.size());
// compute products thrust::transform(thrust::device, a.begin(), a.end(), // first input sequence b.begin(), // second input sequence unnecessarily_materialized_diff.begin(), // result []__host__ __device__(float x, float y) { // transformation (abs diff) return abs(x - y); });
// compute max difference return thrust::reduce(thrust::device, unnecessarily_materialized_diff.begin(), unnecessarily_materialized_diff.end(), 0.0f, thrust::maximum<float>{});}
int main(){ float k = 0.5; float ambient_temp = 20; thrust::universal_vector<float> temp[] = {{ 42, 24, 50 }, { 0, 0, 0}}; auto transformation = [=] __host__ __device__ (float temp) { return temp + k * (ambient_temp - temp); };
std::printf("step max-change\n"); for (int step = 0; step < 3; step++) { thrust::universal_vector<float> ¤t = temp[step % 2]; thrust::universal_vector<float> &next = temp[(step + 1) % 2];
thrust::transform(thrust::device, current.begin(), current.end(), next.begin(), transformation); std::printf("%d %.2f\n", step, naive_max_change(current, next)); }}像这样一段代码,我们确实利用对应的函数完成了,但是写起来很麻烦,事实上我们可以用内置的方法进行简化。
包括:
counting_iterator: 返回对应的索引transform_iterator: 实现对应的operator可以对原来数据的底层 array 进行操作zip_iterator: 则可以把两个相关的数组绑在一个 tuple 里面transform_output_iterator: 当然还可以对原数据进行修改discard_iterator: 也可以对一些数据进行忽略
#include "ach.h"
float naive_max_change(const thrust::universal_vector<float>& a,                       const thrust::universal_vector<float>& b){    thrust::universal_vector<float> diff(a.size());    thrust::transform(thrust::device, a.begin(), a.end(), b.begin(), diff.begin(),                      []__host__ __device__(float x, float y) {                         return abs(x - y);                      });    return thrust::reduce(thrust::device, diff.begin(), diff.end(), 0.0f, thrust::maximum<float>{});}
float max_change(const thrust::universal_vector<float>& a,                 const thrust::universal_vector<float>& b){    auto zip = thrust::make_zip_iterator(a.begin(), b.begin());    auto transform = thrust::make_transform_iterator(zip, []__host__ __device__(thrust::tuple<float, float> t) {        return abs(thrust::get<0>(t) - thrust::get<1>(t));    });    return thrust::reduce(thrust::device, transform, transform + a.size(), 0.0f, thrust::maximum<float>{});}
int main(){    // allocate vectors containing 2^28 elements    thrust::universal_vector<float> a(1 << 28);    thrust::universal_vector<float> b(1 << 28);
    thrust::sequence(a.begin(), a.end());    thrust::sequence(b.rbegin(), b.rend());
    auto start_naive = std::chrono::high_resolution_clock::now();    naive_max_change(a, b);    auto end_naive = std::chrono::high_resolution_clock::now();    const double naive_duration = std::chrono::duration_cast<std::chrono::milliseconds>(end_naive - start_naive).count();
    auto start = std::chrono::high_resolution_clock::now();    max_change(a, b);    auto end = std::chrono::high_resolution_clock::now();    const double duration = std::chrono::duration_cast<std::chrono::milliseconds>(end - start).count();
    std::printf("iterators are %g times faster than naive approach\n", naive_duration / duration);}
虽然只是简单的包装了一层,但是后面的远快于前面的,因为这里我们用迭代器包了一层,转换迭代器的优点是只有在解引用的时候才会计算,这就是 CUDA 的 Lazy Evaluation,减少了访存,但是增加了计算,在 GPU 上是很有性价比的。在现代 C++ 中,我们往往也用得到这些技巧,不过我们这里需要知道的是 CUDA 的这些基本都是 Lazy Evaluation。